![]()
Creating Multi-Layer Widgets
-
Clicking on the Create Widget button will bring up the Create Widget wizard.
-
Select Multi Layer from the Select Widget Type drop down menu to build a Multi-Layer widget.
-
The Select Briefing Book drop down menu will let you choose which Briefing Book to add the widget to.
-
The Widget Name field is where you enter a name for the Widget.
-
The Widget Description field is optional but here is where you can enter a description for the widget.
-
The Layers tab is open by default when you select Multi Layer.
The Create Widget wizard with Multi-Layer selected and the Layers tab active.

-
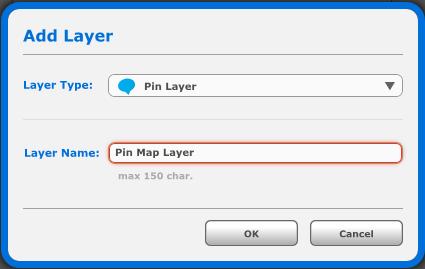
Clicking on the Add Layer button will let you add a layer to the widget. You can add a Pin Map layer, Repeat Locations Layer, Density Map layer or a Response Time layer.
-
You can add multiple layers to the widget. They can be a combination of the above layer types.
-
Once you add a layer you will notice a check box next to the layer name. This will allow you to choose which layers will display by default for the Multi-Layer widget.
The Add Layer dialogue box.
-
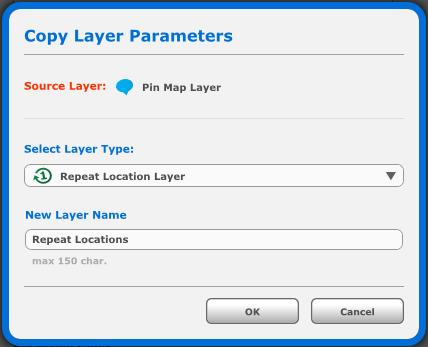
Clicking on the Copy Layer button will allow you to Copy a layer.
-
You can change the Layer type with the Layer Type drop down.
-
Copying a layer will copy the query built for the first layer.
The Copy Layer dialogue box.
-
The Delete Layer button will allow you to delete a layer. An Are You Sure warning message will pop up. Click OK if you are sure you want to delete the layer. Click cancel if you are not.
-
The Set Active Layer drop down lets you choose the active layer for the widget. The charts, reports and tabs for the widget depend upon the active layer type.
-
Once you have added a Layer the rest of the tabs become active. You can then proceed to the What, Where, When and Options tabs for your layers.
-
For a refresher on Creating a Pin Map Query (Filter Widget) Click Here, for a refresher on creating a Repeat Locations layer Click Here, for a refresher on creating a Density Map layer Click Here, for a refresher on creating a Response Time layer Click Here.
Related Links: